
The exhaust system can fail from time to time, and this is why you should learn how to remove exhaust hangers.
The exhaust hangers are nearest to the road. The hangers are susceptible to damage from poor road constructions, bumps, and reckless driving.
Sometimes, you may have to swerve to avoid colliding with an object and knock off the exhaust hangers. All these and many other issues like poor maintenance can damage your exhaust hangers.
How to Remove Exhaust Hangers:
Step 1: Gather All Necessary Tools
The first and most crucial step you must take is to find out the tools you need to achieve your purpose. Tools required are; car jack and jack stand, screwdriver, and mechanic’s creeper.
Other tools necessary include wire cutters, safety glasses, thick hand gloves, user manual, and optional lubricant.
You may likely not have all the necessary tools for this procedure; hence, you need to prepare beforehand.
Replacing exhaust hangers must not commence until all tools are available for use.
Step 2: Secure Your Car by Jacking it Up
Use an excellent quality and recommended jack to support your car before removing the exhaust hangers. Consult your car’s user manual to identify the ideal jack point positions on the vehicle.
Be sure to jack up the vehicle to a safe level above you. A safe jacked-up distance for your vehicle should allow free movement of your body.
Working under your vehicle can be very risky; perhaps you should let a professional mechanic handle this procedure.
Step 3: Discover the Damaged or Loose Hangers
Hangers can suffer a varying number of damages, and some may just become loose and needs readjustment. Be careful when inspecting the exhaust hangers; applying too much force on them may cause tearing.
Since you don’t want them to fall out, you should take your time to inspect them one after the other.
You wouldn’t know if you need to purchase a new hanger until you conduct an inspection.
Final Step: Remove the Exhaust Hangers
It would be best to put on the safety glasses now that you have identified the faulty or loose exhaust hanger. Use your wire cutters to snip off the hangers.
The hangers come with steel cable embedded inside a rubber to make them more durable.
You may need to apply some lubricant before removing rubber exhaust hangers. Don’t over-apply the lubricant to avoid making the whole process messy.
What is an Exhaust Hanger
Simply put, an exhaust hanger can be described as the attachment that holds exhaust pipes in place.
Exhaust pipes are mostly installed underneath a vehicle’s exhaust system; hence the hangers act as exhaust support.
Exhaust hangers often comprise rubbers that help the exhaust keep up with the vehicle’s engine vibrations.
The rubber will also support the exhaust while bending and as the vehicle moves. Exhaust hangers secure the fastening of the exhaust to other components.
These hangers will reduce engine vibration and noise emanating from the cabin. The exhaust hanger ensures the exhaust doesn’t strike the ground during rough vehicular rides.
Reasons Why You Need to Remove Exhaust Hangers
There are three primary reasons why you should remove exhaust hangers, these are;
- Exhausts are too low under the vehicle
One of the significant signs of an exhaust hanger problem is when your exhaust is hanging much lower than usual. This happens when the rubber dries or breaks over prolonged usage.
If the exhaust hangers fail, your exhaust becomes more visible below the vehicle. This means the exhaust may fall off or hit the road quickly.
- Exhaust can be very loud
A loud exhaust can be another problem and a reason to remove the exhaust hanger. Leakages in the exhaust as a result of rusty exhaust pipes can cause hissing noises.
Most noises from exhaust pipes are noticed when vehicle breaks are applied.
- Exhaust decreases the vehicle’s power, acceleration, and fuel management
Specific engine power issues can be linked with exhaust malfunction. If the exhaust hangers fail, they may add extra strains to the vehicle’s exhaust pipes.
Exhaust pipes may eventually shatter if they can’t handle many pressures on them. Faulty exhaust pipes may eventually cause exhaust leaks, which in turn can lead to loss of power.
This issue can also lead to loss of power and more fuel consumption.
Exhaust Hanger Removal Tools
Lisle 38350 Pliers
Specifications:
- It weighs 8 ounces
- Measures 12.2 x 4.8 x 1.4 inches
- Made from heavy-duty material
- Black color
- Five different hinges.
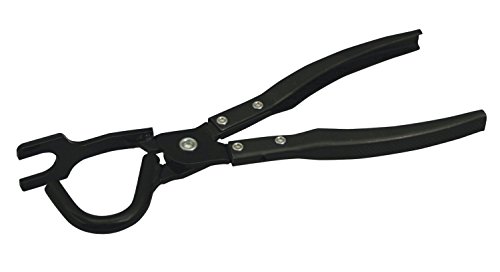
This tool is capable of separating rubber supports from the exhaust’s hanger brackets. It loosens the rubber to make the removal of hangers much easier.
The tool can work fine on any imported or domestic vehicle that uses the rubber hanger support technique. It works on all brands and types of car exhausts.
To operate the pliers, you need to squeeze the handle of the plier on the exhaust pipe rubber. You can then pull the rubber off the exhaust pipe with the applied force.
The plier is made of heavy-duty material that is durable and highly resistant to rust.
There are five hinges with screws on the pliers, and you can adjust these when necessary to suit your needs.
Remove Exhaust Hangers Using Needle Nose Pliers
The use of needle-nose pliers is one of the techniques to disconnect exhaust hangers. This can be achieved in the following steps;
- Gather your tools and secure your car by suspending it on a car jack support
- Check under your vehicle for loose or broken exhaust hanger
- Put on your hand gloves, wear your safety goggles, crawl underneath your vehicle, and position yourself rightly.
- Place your needle nose pliers on the rubber end of the exhaust hanger to snip off the hanger. You may have to apply some lubricant if the rubber is connected to the clamps before cutting off the snip. The plier will shrink as you expand the handles.
- Remove the plier once the hanger has been removed, then install a new hanger if necessary. Make sure you secure the rubber, clamp it to the new hanger, and shake to see it doesn’t loosen up.
- Test your new hanger to see how secured it is, especially when driving. You may want to deliberately drive over speed bumps and ensure there are no unnecessary noises. If the exhaust hanger is still creating issues, you may have to repeat these steps from the beginning.
Dos and Don’ts for Removing an Exhaust Hanger
Dos:
- Unplug your vehicle’s battery to lighten the weight on the entire exhaust system
- Disconnect your vehicle’s Oxygen sensors to improve your safety and reduce potential accident risks
- Always apply lubrication to increase fluidity
Don’ts:
- Don’t yank off the exhaust hanger after disconnection; disobeying this can create several problems in the exhaust system.
- Never get beneath your vehicle to remove the exhaust hanger if the vehicle is still running. Please turn off the vehicle entirely before jacking it up.
Remove Exhaust Hangers Without Using a Tool
You don’t need any tool for this alternative exhaust hanger removal process, but you must jack your vehicle up. The following steps apply;
1. Jack Up Your Vehicle
You will need to jack up your car to a safe distance above you so that you can slide under it.
Use a stand to keep the exhaust line in the correct position. Though this may not be necessary, it will help in achieving a perfect result.
2. Loosen the Exhaust Hanger with Your Hands
Once you slide under the vehicle, loosen the exhaust hanger with your hands as much as you can. This will reduce the hanger’s tension at first, making the next step a lot easier to accomplish.
3. Soak the Hanger Inside a Soapy Water
Soaking the hanger inside a soapy will allow the water within to make the exhaust hanger slick. With the slick feel, the hanger will become much easier to move.
Soak the hanger in soapy water by spraying it from the front to the rear to make the hanger lubricated.
4. Remove the Hanger with Your Hand
With your hand, remove the exhaust hanger carefully and pull out the exhaust pipe. This should take a few seconds to accomplish.
5. Install the New or Old Hanger
With your hand, you can now install the hanger back and make it more secure. The hanger holes must be inserted into the exhaust as well as the vehicle’s recommended hanger-mounting locations.
Read More:
Conclusion
Lack of maintenance on exhaust systems often results in the development of many exhausts hanger issues.
Sometimes, technicians don’t pay attention to the factory-fitted exhaust system arrangements after completing repair works under the vehicle.
This will eventually cause loosening and eventual dislodgment of the exhaust hanger.
Keep in mind that ignoring a loose or broken exhaust hanger can lead to other problems with the exhaust system. Leakages can occur when the exhaust pipe bumps into hard surfaces.
The more you ignore exhaust hanger issues, the more expensive damages you will inherit.
Perhaps the best way to pay careful attention to your exhaust hangers is to check them daily.
The dislodgement of hangers doesn’t happen suddenly; the rubber and clamp system can withstand several bumps.
It is when the rubbers and clamps become overwhelmed that significant damage or dislodgment on hangers becomes apparent.