The excitement of climbing a tree, branch by branch as you go higher and higher is indeed incomparable.
However, whether you’re a hobbyist or a professional arborist. you really need to have adequate knowledge and skill and one of those is knowing how to hang a climbing rope on a tree.
The passion for tree climbing can be because of the love of the beauty of nature that drives one to explore. It can also be due to the interest in it as a sport.
Well, it can actually be both. People climb trees because it offers a good way of exercise while meditating and reconnecting with nature.
Whatever your motivation for tree climbing maybe, this article will provide you with complete instruction on how to securely and effectively climb a tree with a rope.
We will also answer some of the frequently asked questions about tree climbing.
So, let’s get into it!
How to Hang a Climbing Rope from a Tree
Tying a rope into a tree may be very hard to imagine but it’s actually very easy and achievable as long as you learn the tips and tricks on how to do it.
Here are the simple yet very precise ways that you can follow in hanging a climbing rope:
Step 1: Prepare your Equipment
Throwline- this is a thin glossy rope that has a 1.8 mm to 2.2 mm diameter which is attached to the weight and will then be tossed into a tree.
weight or throw ball- this is a bit heavy object where the throw line shall be connected to.
As the weight is thrown over the tree branch, it will easily hit the ground as the weight of this object pulls the throw line towards the ground
climbing rope – this is the very rope that will be tied into the tree. This is what the tree climber would use to climb up.
launcher– although this is optional, this will surely make your life easier, especially for those who don’t know how to throw the throw line up the tree.
This will launch your weight as you pull the trigger and effectively reach the tree’s branch where you plan to hang your climbing rope.
proper protective gear such as helmet
Step 2: Choose the Right Tree
Climbing trees is sure to be fun and healthy. However, it is of utmost importance to choose the right tree for your safety and protection.
So what makes the right tree for climbing?
Here are some important factors to consider as you choose a climbing tree:
The tree must be able to support your body weight. It should be big enough to carry the weight that you put into it so that it does not break.
Choose a branch that is at least 6 inches in diameter minimum. Trees with branches that are big enough for tree climbing are usually 18 inches in diameter or larger.
Never pick a dead tree. Always look for a tree that is healthy. This will securely provide you with a strong branch that won’t break.
Find a tree that is free from external hazards.
What does this mean?
Those trees have power lines running through them. Neither of those trees has birds nests, bees, wasps, or hornets. These animals can be nasty when their territory is being invaded.
Consider your throwing skills and comfort level. Simply put, choose a tree that you are comfortable with when throwing the throw line.
For beginners, start with trees that are not so tall. When you’re accustomed to that height, you can go taller each time.
Step 3: Connect your Throw Line to the Weight
The first rule of your throw line is to never wrap it. You need a container to feed it. Uncoil the throw line and stretch it with tension so that it will be nice and straight.
This will be working all the kinks out of it and allow you to flake it really evenly into your container.
When you’re attaching your throw line to your throw ball, tie at one time and leave it as it is.
To do so, tie a figure-eight climb knot and then girth hitch the loop into the thrown ball.
Step 4: Get Ready to Pitch
It is really beneficial that you are able to throw the throw line without using a fancy gadget.
Here are two basic ways to throw a thrown ball by hand:
Two-handed granny-style throw
This is done by doing a pendulum between your legs. It’s a great technique because you can square yourself up to your target since it’s positioned in the center of your body.
To do this, make a bight from the throw line and put it through the ring of your throw ball. Then pull it through.
This will give you one bight on one hand and hold the line itself with your other hand.
Swing the thrown ball back and forth between your legs and keep the slack out of it.
When you have the intensity, toss your throwball towards the branch and just let go of the throw line that you are holding.
One-handed throw
This is another very popular technique that tons of people prefer. it’s the same pendulum motion but the difference here is it is off to the side and not in the center of your body.
When you know that you’re on the rhythm, launch the thrown ball towards the target branch and let go of the throw line.
However, when you still can’t get the hang of it, you can use launchers that will help you pitch your throwball and reach the branch successfully. These launchers are sold in the market today.
Step 5: Connect the Climbing Rope to the Throwline
As soon as a thrown ball hits the ground, go get your throw line and disconnect it from the throwball from the knot where you have pulled your weight from.
Girth hitch your climbing rope to it. Flip the knot around and insert the climbing rope into the loop.
Bring it about a foot or so towards the end of the line and make sure it’s good and tight.
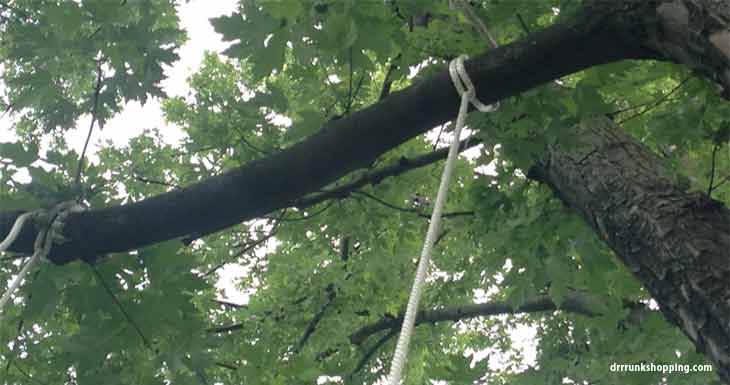
Step 6: Pull it Across the Limb and tie
Simply pull the rope up and over the branch then tie a timber hitch.
A timber hitch is a knot that is used to tie the working end of the rope to another object such as a tree.
To do a timber hitch, what you will need to do is take the working end of the rope and wrap it around the tree. Take the working end and lay it on top of the standing end
Then take the working end in and bring it around behind and underneath the standing end.
Wrap it on itself and back along with itself 4 to 5 times. Cinch it down tightly, making sure it does not loosen up.
This is a great way to secure your safety as you climb up the rope because the more you pull the rope, the harder the load is.
The more that the rope actually cinches on itself, the working end tightens upon itself as well and the more secure the knot is.
FAQs
Which Rope is Best for Climbing?
The 24-strand climbing rope from USA rope is best for tree climbing due to its balanced structure which protects its layers from abrasion. At the same time having high-breaking strengths.
It will withstand both wet and dry use, even with the presence of sunlight and chemicals.
It also has good endurance to maintain its good loading performance over time. It is user-friendly and has good resistance to rotation yet is soft enough to make knots which is ideal for tree climbers.
How Long Should a Climbing Rope Last?
A climbing rope’s lifespan varies due to different influences that weaken the rope. However, when we talk about the usability of the rope, you can follow this guideline.
- Never been used- 10 years maximum use
- Used twice a year- 7 years maximum use
- Used once a month- 5 years maximum use
- Used several times a month- 3 years maximum use
- Used twice per week- 1-year maximum use
- Used daily- less than a year
What is the Difference between Arborist Rope and Climbing Rope?
Arborist ropes are solely intended for tree climbing while climbing ropes can be intended for rock climbing or caving. When you want to do tree climbing, always use arborist ropes.
Climbing ropes which are dynamic ropes are very stretchy while caving ropes won’t make arborists knots due to their stiffness.
What is the Difference between Static Rope and Dynamic Rope?
There are two types of rope that you see in the climbing world: dynamic and static rope.
Dynamic ropes are designed to stretch if the climber falls into it, reducing the full factor and force in the rope. This is best for rock climbing.
A static rope is designed not to stretch very much. This is usually used for abseil lines and when you don’t need bouncing up and down. when you fall into it, the shock loads it, and things get a bit snappy.
Related Helpful Resources:
- How to Make Tree Climbing Spikes
- Pole Spikes vs Tree Spikes
- Arborist Helmets for Tree Climbing – Buyer’s Guide
- Tree Climbing Spikes Buyer’s Guide and Reviews
- Tree Climbing Sticks Buyer’s Guide and Reviews
Conclusion
Now that you have fully learned how tree climbing works and its tips and tricks, we hope that we have helped you in your tree climbing journey.
Always remember that amidst the fun and excitement, safety should never be compromised and must always be prioritized.
If you just carefully follow the very detailed steps on how to hang a climbing rope from a tree, then you will surely enjoy tree climbing without the fear of danger and mishaps.