A grease gun is vital for lubrication that people use in heavy equipment and machinery. Knowing how to bleed a grease gun will surely give you better results.
It will surely make the work faster and easier while saving you from the slick and smelly grease that may be harmful to your equipment when used in the wrong way.
Lubricating your tools and equipment is of utmost importance. This is where a grease gun comes in handy for you. However, not everyone knows how to bleed a grease gun properly.
In this article, we have laid down for you the basic steps in reloading and bleeding your grease gun.
We also discussed grease gun troubleshooting and maintenance and answered some of the most common questions regarding this topic.
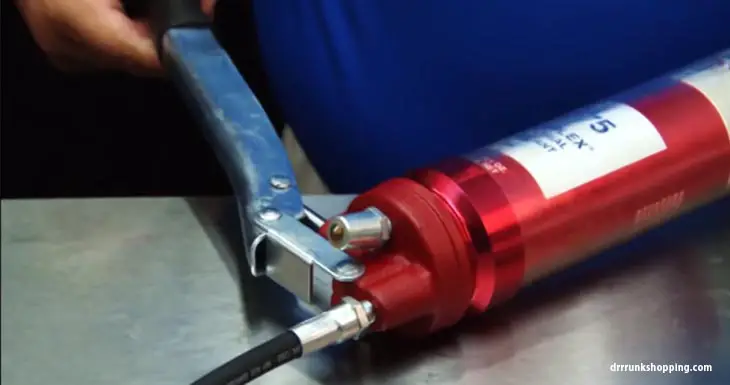
9 Steps to Bleed a Grease Gun:
When you finally decide to use your grease gun but you notice that it has trouble pumping grease out of it, this means that air is trapped in it.
This is a very common problem that you will encounter from time to time. This usually occurs when you change your grease cartridge and pump it for lubricating fittings.
Doing so leads some air to be trapped inside the air space located at the top end of your grease cartridge.
If this is left unnoticed and instead you tend to keep squeezing the handle, this will surely lead to further damage.
That’s why when this problem occurs, it’s really a must to bleed your grease gun.
Here are the simple steps that you can follow:
Step 1: Empty the Barrel
You will need to change your grease cartridge when it’s almost empty. You will know this when the air gets trapped in your grease gun.
One important thing to keep in mind when you store your grease cartridge is to make sure that you store them with the part that you tear off on the bottom. This will allow the grease to settle in that direction.
What you’re going to need to do as you replace the cartridge is grab your gun and just twist the barrel off and then pull the t-handle a bit. This will allow the empty cartridge to pop out.
Once that pops out, you can just pull it off using a towel or a rag.
Step 2: Lock in the Plunger
The next thing to do is to pull the t-handle all the way back in. There’s a plunger lock to lock that in place back there.
Be careful not to let the spring go forward and hit you with some grease or catch your fingers.
Step 3: Insert the New Cartridge
Get your new grease cartridge and take off the plastic or rubber cap. Then slide that down with the end without the cap into the gun first.
Step 4: Peel off the Lid
Once you get the cartridge inside, go ahead and pull the cover off. Make sure to do it slowly not to splash some grease away.
Step 5: Reassembly
Screw the barrel back on your grease gun but do not screw it super tight yet. You want to make sure that the lever is on the catch so if you push on it, it doesn’t move forward.
Step 6: Bleed the Air Out
Try to push the rod and t-handle all the way back in and get rid of any air pockets in the grease.
This is where bleeding your grease gun happens. If things are going well, you can twist the t-handle and it will go all the way in.
Step 7: Tighten Things Up
Now, you can tighten things up and everything is going to work. The grease inside the barrel will build up pressure and purge the air out from your grease gun.
Step 8: Pump to Check
Usually, if there’s no problem with the grease gun, you just have to take 3-5 pumps of the handle to get the grease coming out.
Step 9: Troubleshooting
However, if you have already tried to pump the handle at least 30 times and still no grease is coming out, that means an air bubble is left inside.
When this occurs, what you can do is repeat step number 5 until step number 8 and observe if this time, grease comes out of the hose.
Remember that reloading your grease gun and bleeding the air out is really not a big deal. But make sure to take it a step at a time, and everything should go fine.
Maintaining a Grease Gun
A common scenario that can occur in any grease gun, whether it is a pneumatic, electric, or manual variety, is a blockage.
This common issue stems from contamination. Debris is the number one cause of failure.
This can be anything from the dried-up lubricant, dirt, and rocks, as well as wooden or plastic tips blocking the inlet to the hose or checks and passages in between.
For this reason and others, the performance of the gun has been reduced. That’s why performing a clean-out procedure is recommended.
When you use your gun frequently, this procedure should be performed once every couple of months or when pressure and dispensing performance begins to diminish.
Prepare the Following Safety Equipment for Maintain a Grease Gun:
Step 1:
- Eye protection
- Gloves
- Wrenches
- Cleaning brushes
- Hammer
- Shop towels or rags
- Cleaning oil
Step 2:
Remove the grease tube assembly from the gun head. Also, remove the following rod and spring assembly from the tube.
Both will need to be wiped down before reassembly.
Step 3:
Flip the gun head upside down and remove as much remaining lubricant from the head as much as you can to expose the plunger and the inlet port.
Step 4:
Also, remove the lubricant from the front face of the follower assembly. Doing this will reduce the chances of further contamination.
Step 5:
Fill the head inlet cavity with the cleaning fluid and let it cycle through the unit.
Step 6:
With the unit filled so the inlet passage is covered, cycle the gun and dispense the fluid out the open end.
This step can be performed on its own as a clip field flush to break up most debris or dry lubricant that is blocking the passages and force it out of the unit.
Step 7:
To access the check ball and seat area, remove the cover plug along with the spring and finally check the ball.
Using the cleaning fluid and a combination of brushes, thoroughly scrub all passages in the head to knock any remaining loose particles so they can be removed.
Step 8:
Examine the check ball for deformities and markings just like the marks on the checks seat. Markings on the check ball may cause pressure and volume loss. Replace the check ball if necessary.
Step 9:
To recede the ball, whether it is the original or if it needs replacement, use a small dowel rod or brass punch, and with the ball pressed firmly into the check seat service, give the dowel a light to medium tap with a hammer.
After the check ball has receded, insert the spring then thread down and tighten the plug.
Step 10:
This completes the cleaning process. With everything wiped down, completely cleared of any debris and old grease, it is now time to finish reassembling the tube assembly.
Do not insert the used cartridge of grease if this cleaning was performed in the middle of dispensing a cartridge.
Always start fresh with a new unopened cartridge after cleaning, in case the used cartridge is contaminated.
FAQs
1. How do you Get air Out of a Grease Gun?
When you try to pump the handle yet grease is coming out is a common occurrence with every grease gun once you put a new cartridge in.
To fix this problem, simply turn it anticlockwise two or three turns to release the air at the top of the tube. Then, pump the grease gun until the grease starts to come out.
Hold the handle and press. Tighten the tube back up, and your gun is ready for use.
2. How do you Release a Plunger Lock Grease Gun?
To do so, you just have to pull the rod handle which is connected to the end of the gun until the whole cylinder bar is visible outside. Take note that you will only pull the plunger if the cartridge is empty.
Simply pull the plunger and then lock it to the side, making sure that it stays up while you are pulling the empty cartridge out.
3. What is the Best Heavy Duty Degreaser?
When it comes to heavy-duty degreaser, the best brand that excels is Simple Green 19128. It has unique features that will surely outstand other brands.
It performs very well in cleaning and leaves no awkward smell on your equipment. it can also be used everywhere whether it’s for equipment use or in the kitchen.
It is also non-toxic which is not harmful to your body and is non-corrode that won’t make your equipment rusty.
Conclusion
Now that you have learned how to take care and properly use your grease gun, we hope that we are able to help you prolong the life of your tool and maximize its ability.
Always keep in mind that good knowledge and proper execution are indeed very significant for any tool or equipment.
On the other hand, when things are done improperly, your grease gun can surely make a big mess.
That’s why knowing how to bleed your grease gun and practicing the tips and tricks that we have laid down for you will surely take your tool to a more effective and functional level.