Using drywall stilts offers the extra balance and stability needed during your DIY home improvement projects, whether it’s plasterboard construction or painting.
Unlike regular stilts or ladders, drywall stilts are less fatiguing, easily accessible to tight spaces, and help you perform with better precision.
Remember, you will be working on different parts of your home. Hence, each area may need you to readjust the stilts for safer and sufficient accessibility.
After all, poorly positioned drywall stilts can be the recipe for occupational hazards.
To help you achieve the perfect placement during every home project, we’ve shared a detailed guide on how to adjust drywall stilts.
How to Adjust Drywall Stilts:
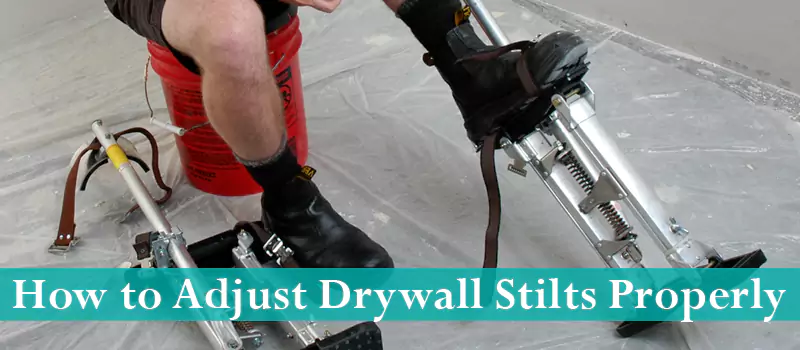
Step 1: Adjusting the Foot Area
Once you have got your drywall stilts assembled the first adjustment that you are going to make is gonna be on the foot area.
Not everyone has the same size of their foot so everyone has to adjust the footing area.
If you take a look at the foot area you will see some holes there. They are used to adjust the heel area according to the footplate. You can adjust that according to your feet’ size.
After that, you can strap your feet and check if the feet are sitting comfortably or not. If not then adjust the plate by trying another hole. This way you’ll find the perfect spot.
Step 2: Adjusting the Height
Once you have got the desired footing size and your feet fit on the plates well. The next thing to do now is to adjust the height of the drywall stilts.
This step is not very difficult but it does require quite a bit of your attention.
In order to adjust the height, you have to uninstall the wing bolts and then slightly raise the stilts to the height that you feel is comfortable or necessary for you.
Make sure to raise both of the stilts evenly, if not done right, there will be a lot of pressure on your one leg.
Once the desired height is reached and the stilts are perfectly balanced, you can now put the wing bolts back one.
To reinstall them you have to align the holes in the legs and the holes in tubes. Once they are aligned, tighten them up.
Step 3: Adjusting the Forward and Backward Balance
In the whole process of adjusting drywall stilts, this is the most difficult part. What kind of walk you are going to get with stilts depends upon this.
Adjusting the forward and backward balance is done by a spring assembly fitted in the middle of the unit.
When you are standing vertically upright then your stilts should be in a neutral position and you should not feel any kind of discomfort or force, either backward or forward.
But if this is not the case and you are feeling some kind of discomfort and you are not perfectly balanced. Then you can do the following adjustment in the spring unit.
When you are standing still and your body tends to lean forward then you need to adjust the lower coil of the spring adjuster. In this way, the forward lean will be balanced out.
And if you tend to lean backward then you’ll do the opposite. In this case, you’ll be adjusting the spring adjuster located on the upper coil.
It will be enough to correct your balance, but if you are not happy, you can adjust the clamp brackets as well.
Step 4: Inwarding and Outwarding Balance
This is the last step of adjusting drywall stilts. Once you are standing upright on the stilts you must feel a little bit of pressure pushing your legs inwards.
But if this is not the case and you feel pressure pushing you outwards or there is a lot of pressure inwards.
In order to do it, you have to loosen the bolts located beside the leg straps. After that, you’ll be able to slide the strut tube and clamp assembly in the direction you want. Play around with it and find a comfortable spot for yourself.
In the optimum position, there will be a slight pressure on your legs pushing you inwards. Once you find that you can tighten the bolts again and you are good to go.
Also, Read Our Related Guides on:
Why Drywall Stilts?
There are many upsides to using drywall stilts. Fairly easy to use and provide a lot of help in reaching the places we cannot reach otherwise or have to use a ladder.
- They save time.
- They save the effort of using the ladder.
- There are some spaces where the traditional methods are not very suitable.
- They are easy to work with and require a little effort to learn.
Using Drywall Stilts
Perfect adjustments won’t save you from falling and hurting yourself when you don’t use these stilts properly. Follow the guides given below on how to use them properly.
- When putting them on, make sure to strap the leg first and then the foot.
- When taking them off do the opposite and remove the foot strap first and then the leg strap.
- Make sure you always take small steps.
- Before every use, you need to check that each and every bolt is tight and there are no loose ends whats-so-ever,
- Make sure that there is nothing on the sole that might cause any loss of traction.
Conclusion
Working with stilts may be a little bit tricky. But if you manage to master it, this provides some good benefits.
You need to ensure that you are using them properly and are taking care of all safety concerns.
We’ve given you some tips and tricks to help make the process of adjusting drywall stilts as easy as possible so that your home or office has a smooth wall surface.
Follow these simple steps, and you should be well on your way to having an even, unblemished wall.