Style and elegance may be added to a vehicle’s exterior with the addition of a truck cap or camper shell.
When you’re out camping or traveling, a truck cap is a terrific way to protect your belongings from becoming wet or muddy while also serving as a handy temporary shelter.
In certain cases, you’ll need to know how to wire these caps if they don’t come with pre-installed lights.
Despite the fact that it may seem difficult, doing this activity is straightforward and can be accomplished by just about anybody.
Dome lighting is very convenient and enhances the look of vehicle interiors. Most of the time, you’ll encounter these kinds of installations in commercial vehicles.
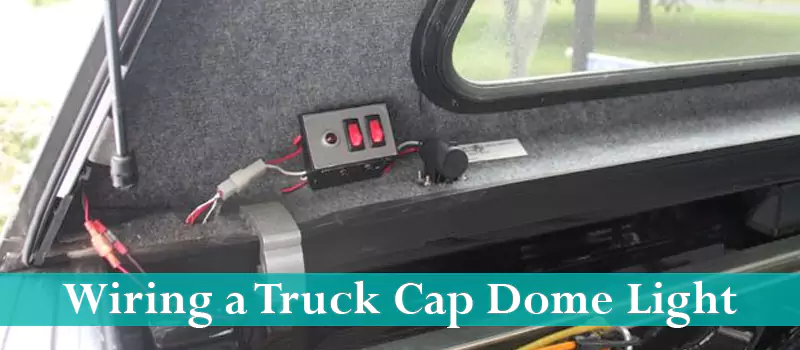
Steps to Wire a Truck Cap Dome Light:
Disconnecting the vehicle’s battery is the first step in wiring your truck cap dome light. In order to remove and replace the dome lights, you must do it in a certain way.
In the midst of all of this, you’ll need to swap out the light fixtures and install new wiring. Everything has been wired up and is ready to go.
While they may be challenging, it’s worth the effort. But don’t worry; we’ve compiled all you need to know in one place.
Here is the list of necessary tools you will need to wire a truck cap dome light:
- Pliers
- A wire stripper tool, or simply scissors, will suffice.
- Ratchet and 8mm socket
- Voltage meter or multimeter
- Soldering iron
- Electronic solder
- Safety glasses
Step 1: Connect the Light to the Power Source
To avoid harm in the case of a short, make sure the battery in your car is disconnected.
To avoid injury or damage to your car in the event of a short circuit, remove your vehicle’s battery.
Remove the truck’s ceiling-mounted dome light. Retract a little fraction of both of its cable lengths to begin.
Push the ends of the wire through the headliner panel’s edge as rapidly as you can. Solder the wiring for your truck’s dome lights into position once they have been assembled.
Wire strippers are required for this task. In the other step, you just have to attach the lights.
Step 2: Attach the Dome Lights
The dome light in the headliner needs to be replaced. Attach the dome lights using the strong-duty adhesive glue included in the package.
Assemble them where necessary. In other words, when you’re connecting the wires one at a time within the vehicle’s cap.
Using a pair of wire cutters, remove the light from the cab’s ceiling and cut back both of its cables. In the other step, you just have to wire the lights.
Step 3: Connect the Lights
In order to feed the wires, use the wire cover tube that comes with the package. Then use the heavy-duty snips to cut the tube in half.
Slowly but surely. Take care to avoid severing any cables. The package comes with a bottle of high-strength adhesive. Attach the wire cover tube to the truck cap dome light wiring.
If you’re having trouble, try some of your suggestions for high-quality adhesives. Before placing each wire into the quick connect, cut and remove a little bit of it.
In most cases, it’s included in the set. One drop of solder is all that is needed to secure each one.
The little panes in the truck’s rear window are used to open the truck cap’s pass-through glass. Fast connect on the truck cap may be connected to the joiner cable included in this package.
Your dome light is now operational. To see whether it’s working correctly, click on the switches. It will instantly brighten the inside of your vehicle.
By cutting a hole in the headliner and passing them through there, you can wire the dome light circuit with the vehicle’s power and ground.
Plug the dome light’s wires into the proper electrical socket, or securely link the dome light’s wires to your vehicle’s dome light wiring.
Power and ground may be applied to any wire on the dome light. Do not use connectors that are missing their insulation or have exposed wire.
Why is Dome Light So Necessary?
The inside of the vehicle’s roof is where the dome light bulb is mounted. It’s usually located in the middle of the car, near the rearview mirror.
Its main function is to provide illumination for passengers in low-light situations. As an example, whether driving at night or parked in a garage,
The courtesy light bulb is sometimes housed in the dome light bulb. As soon as the doors are opened, it instantly turns on.
There is no need for the vehicle’s performance or safety to be compromised by the dome light’s lighting.
However, it is a convenience that enhances the driving experience for passengers. If the dome light bulb dies, this function will be deactivated. Passengers were left in the dark as a result.
A malfunctioning dome light bulb might generate a variety of symptoms. It is necessary to alert the driver of an issue that has to be addressed.
Also Read: How to Wire a Doorbell from a Light Switch
Conclusion
Now that you finally know how to wire a truck cap dome light. Disconnecting the vehicle’s battery is the first step in wiring a dome light.
In order to remove and replace the dome lights, you’ll need to swap out the light fixtures and install new wiring. The inside of the vehicle’s roof is where the dome light bulb is mounted.
Do not use connectors that are missing their insulation or exposed wire. There is no need for the car’s safety to be compromised, but it is a convenience that enhances the driving experience for passengers.
So, placing the dome light is very essential for you.
.