It is a common scenario within the retail industry to make Slatwall panels installation on drywall. Slatwall is a customizable and affordable wall panel material utilized for organizing and displaying objects on the wall.
The drywall is perfect for this installation because of the available surface area.
First, you need to make sure your drywall is strong and painted. This will save you from stress in case you need to move the Slatwall to another location.
Then, understand how Slatwall works and if it’s perfect for what you want it for.
If you’ve done these, you should be ready to get started. Below are the detailed Slatwall panel installation instructions for beginners.
10 Steps to Install Slatwall on Drywall;
Before you proceed to place Slatwall on drywall, it’s a good idea to go over the building code. This is to make sure you’re not breaking any rules.
It informs you about obtaining a permit and the kind of items you’re allowed to drill into the wall.
Items Required
The tools and items you’d need for the installation are as follows:
- Drill/screw gun
- Flathead screws (1½” or 2”)
- Tape Measure
- Circular Saw
- Level
- Marker/pencil
- Safety glasses
- Jigsaw
- Construction or panel adhesive
- Ladder
- Stud Finder
- Trim/stain
It is also advisable to get one or two assistants to help out. Just one person should be enough, but getting two people would make your work even faster.
Step 1: Ensuring Safety Measure
The first step in the PVC Slatwall easy installation is to ensure safety during installation. Use safety glasses before operating power tools and hearing protection before using any loud equipment.
Remember that Slatwall panels are quite heavy, and would be advisable to lift them with help from another person.
Step 2: Determine the ceiling’s lowest point
Locate the lowest position on the ceiling and use a pencil to mark a straight line across the room. The first panel is the most important and it’s essential to make sure it’s level.
Step 3: Finding the Center of the Studs
A Slatwall can be installed directly on drywall, stud, or plaster. Using a stud finder, locate the center of the stud and mark that point on the level line you’ve drawn.
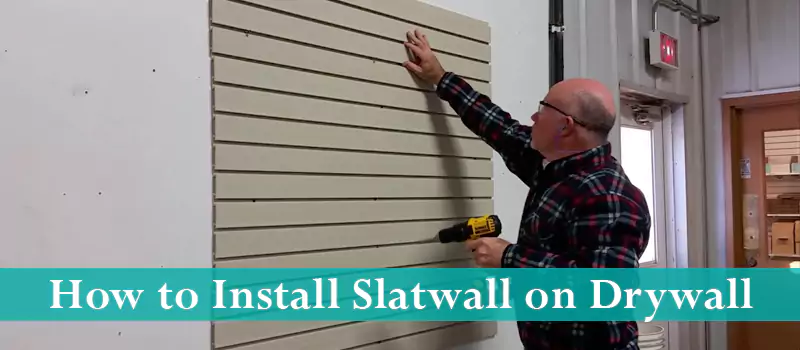
Step 4: Installing Slatwall on Drywall
Now, align the Slatwall against the wall you intend to begin from. Place it so that it levels up with the corner of the wall. Using the leveler, double-check the leveling and make sure it looks exactly how you want it to.
Step 5: Marking all the Important Points
Use a pencil to mark the top of the Slatwall after leveling and its bottom. Then, mark the screw holes you’ve drilled. This is crucial in case you decide to switch the panels to another setting.
Step 6: Drilling through Slatwall Panel Slots
If your walls are perfect and strong, fixing the Slatwall directly on the wall is possible. You only have to drill through the Slatwall holes while making sure the panel is level.
Then, attach the Slatwall with long screws to the drywall as you would plasterboard.
You could also spread the panel or construction adhesive behind the panel. This is optional but would add a bit more strength and stability to the construction.
If you’d be adding adhesive, around a half-tube should be enough for a panel. Ensure you fill in all the pre-drilled holes on the Slatwall to accomplish a perfect gripping.
Step 7: Cutting the Required Portions
If you need to cut through the Slatwall panel, do so with the circular saw. Place the saw blade inside one side of the panel with the front side facing down.
If the panels come with aluminum inserts, let them remain within the groves while you cut through.
Using an adequately sharp Jigsaw, cut through the metal. If you let the metal remain in the Slatwall panel, ensure you hold it down with tape.
Cutting spaces for electrical boxes can be challenging because you only get a trial to get it right. However, it is possible.
Measure the space multiple times to be sure but cutting has to be done once. You can measure on either side of the Slatwall panel.
First, drill a large hole that can fit the saw blade. Then, cut the Slatwall until you have the opening you want. Confirm the size and the material fits before gluing together with an adhesive on the back.
Step 8: Repeating the same Process Until Done
Do the processes above for the other Slatwall panels and make sure all the panels are lined up properly.
Step 9: Cleaning Excess Adhesive and Lines
Clean any adhesive that has gotten on the front of the panels using a lacquer thinner or any other solvent.
Also, use the same process to clean the pencil lines you’ve drawn along the way. Then, clean the panels using a soft cloth and any gentle household cleaner.
Step 10: Following all the Dos and Don’ts
One of the recommendations is to distribute the weights you place on the Slatwall panels equally. Also, ensure you use all the tools as described by the manufacturer.
Avoid climbing or stepping on any of the accessories. Do not overload them with extra weight and don’t drop any heavy items on them.
Conclusion
Now, you know that installing Slatwall on drywall is quite easy and you can take on this project yourself. Slatwall must be done with extra care and that is what positions them to serve the purpose you want.
If done correctly, your Slatwall can serve a number of functions, and fit into different display sizes and shapes. Some of the purposes they can serve to include wares display, store decorations, goods shelving, among others.
Slatwall is also perfect for remodeling and renovation purposes. There is almost no limit to how they may be used. Now that you know the exact steps on how to install Slatwall on drywall, why not give it a shot?