Doorbells are usually powered through a doorbell transformer, which has to be professionally mounted so that it can carefully extract power from your electrical system.
But you can connect your doorbell to a light switch. It will not only provide enough electricity to function but also an additional source to turn the doorbell on or off just by using a light switch.
If you already have working doorbell chimes and transformers wiring process becomes simple and convenient.
Adding an outlet from a light switch is straightforward, and it takes just a few dollars and a little time to do.
But it is important to know the proper method to perform a wiring process for connecting a new or existing doorbell from a light switch.
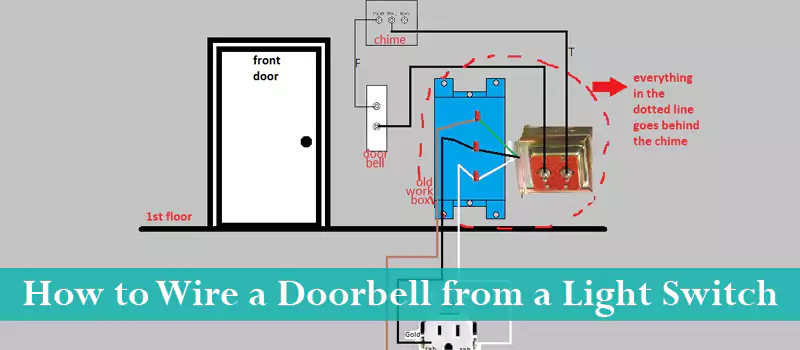
How to Wire a Doorbell from a Light Switch
If your home electrical system for a doorbell isn’t prepared and set yet, it is practical enough to consult an electrician.
Before wiring the doorbell switch with light and working with electrical wires, you must ensure your safety, use a voltage sensor to make sure that the power is off.
Follow these steps carefully to complete the wiring process conveniently.
Step 1: Unscrew Existing Doorbell
While wiring an existing doorbell to a light switch you can start by unscrewing the doorbell. Locate the screws used to mount the doorbell to your outer wall or door casting. Unscrew them using a screwdriver or a power drill.
It will expose the internal wiring of your doorbell allowing you access to modify the system and link it to the light switch.
You can easily work with the wiring inside by testing and locating the feasible one for attachment.
Step 2: Find the Doorbell’s Hot Wire
You have to find the hot wire i.e. the one with enough electric current supply. The wire is easy to locate, mostly in black and wider than other wires. But the specifications may differ based on the brand of doorbell you use.
There is another way of distinguishing the hot wire from the live current. You can use a voltage tester to test each of the wires separately.
The best way to do so is to turn the switch off and test all of the black wires by placing one of the leads of a voltage tester on the wire and the other one on the ground screw.
Carefully observe, the tester will light up when you attach it to a live wire. You also have to identify a neutral wire from the light switch as well to create a link.
Once you have identified the wire, turn the circuit breaker off before starting the wiring procedure for absolute safety.
Step 3: Find the Neutral Wire for Light Switch
The next step is to identify a neutral wire from the light switch for making a secure connection. If the doorbell doesn’t have a built-in light, you can easily link it to any natural wire from a light switch.
A doorbell switch with a light built-in is comparably easily connected.
Go to the switch box of your house and follow the hot wires to the switch that has full control over the circuit powering the doorbell.
This wire is also can be readily located. It is usually white and is thinner as compared to other surrounding neutral wires in the switch box.
Now you have to link both of the wires together to secure a connection for wiring a doorbell from a light switch.
Step 4: Wire the Doorbell to the Light Switch
Take the black wire from the doorbell and connect it to one of the neutral hot wires from the switch box. You can start by disconnecting the black wire from the doorbell and splicing it together with the wire going to your outlet.
You will also require a certain length of exposed copper wire. Make sure the wire is approximately an inch longer than the needed length.
Connect one side of the exposed copper wire to the splices doorbell cable.
Then, connect the other end of the copper wire to any of the hot wires from the switch box to make a connection in between. You also have to connect the white neutral wire from the switch box as well.
Step 5: Wire the Neutral Wire
Attach the white neutral wire from the switch box to the neutral copper wire coming from the outside. By this method, you can connect the doorbell to the light switch in no time.
The doorbell wired to the light switch will ring whenever you flip on the light switch.
If the bell doesn’t ring you have to try rewiring everything once again. It is vital to ensure the copper wire is completely covered and concealed. It shouldn’t be touching any wires or other metal parts.
Step 6: Hide Your Wires
You have to conceal the wires after the wiring process to ensure the durability of your wiring system.
You can arrange the wires and hide them behind your furniture so that they are not seen by anyone. Concealing the wires also saves them from any damage.
Make sure that any exposed copper is capped off with electrical tape or wire nuts to save it from wire cutting or chipping so that the system can last longer.
You can use the same method for wiring a ring doorbell to a light switch.
Also Read: How to Wire a Light Bar to a Toggle Switch
How to Wire a Double Button Doorbell?
You can also mount two buttons for a single chime at the front and the back of your home. By installing double regulators you can operate one bell with two buttons.
You can use two-button settings either with an old doorbell wiring or mount a new one.
A single receiver can be used by two doorbell buttons at different locations. We have devised a comprehensive guide to help you with double button doorbell installation:
Step 1: Switch off the Electrical Supply
Before starting the wiring procedure, it is practical to turn the electrical supply off.
While wiring a doorbell you have to work with electricity and the doorbell transformer box that contains live wires.
You should always start by turning off the electrical supply to ensure your absolute safety and protection.
Step 2: Mount the Doorbell Buttons in the Correct Position
Select the best position on your outer wall or door casting for mounting the doorbell buttons.
It is important to mount the doorbell switch at a location so that it is appropriately reachable and accessible.
Step 3: Set up the Doorbell Receiver
Next, you have to place and connect the doorbell receiver in a suitable location. Place the receiver somewhere to make the bell audible around your house.
For better installation, it is also recommended to check and follow the installation instructions provided by the manufacturer.
Each brand has its own requirement, that’s why you should always follow the proper method for setting up buttons as well as the receiver.
The receiver should be placed in a way so that the bell can be heard everywhere around your house.
Step 4: Place and Attach the Cables
Create an accurate layout for wiring the double doorbell buttons to the receiver and the electricity supply. The wires should be completely organized and hidden.
It will not only make everything appear neat but also help prevent wire damages following the installation process.
The process is quite easy. You just have to connect a wire to the terminal of the front door button and attach this cable to the receiver.
The same thing can be repeated for both of the buttons. Don’t mix up the wire colors of both the doorbells and attach them precisely.
Make sure to connect the accurate wires from the bell to the terminals of the regulators.
Step 5: Check the Cable Circuit
Finally, check both of the doorbell switches for proper functioning. If the doorbell is not working properly try the wiring process once again.
Make sure to cap and cover the wires for improved durability. You can attach double buttons to work with a single bell while wiring a ring doorbell to a light switch.
What Safety Measures to Follow during Wiring a Doorbell?
There are always security risks involved while wiring a doorbell from a light switch or working with any type of wiring system.
That’s why you should always follow safety precautions to avoid any chances of injuries or damages while mounting a new doorbell or replacing a doorbell switch.
Make Sure the Power is off
Before wiring the doorbell, you should ensure that the breaker or power source is switched off.
Lock the breaker if possible or else make sure that everyone is in the house. It might be logical but vital for a safe work environment.
Wear Glasses and Protective Clothing
Covering yourself is also essential while working with electrical wires. You won’t want sparks or other fragments to get in your eyes.
The glasses can save your eyes from any damage. You should also use gloves while working with live wires for your safety.
Always Test First
Always use a voltage tester to ensure the wires don’t have any love electricity. Each wire and connection should be dead before you start working.
The process includes cutting and splicing wires, so it can be dangerous if the wires are live.
Conclusion
The process of wiring a doorbell from a light switch for powering it and using more than one button for ringing the bell is quite easy and simple.
But before wiring a doorbell you should make sure the electrical wiring system in your home is highly modified and well maintained.
This way, when someone rings at your front door or presses their wireless button, they won’t have to wait for the bell sound to know that someone’s at the door.
This article provided all the information required for the proper wiring process. It will guide you for precise installation with effective results even for connecting a ring doorbell to a light switch.